Welcome!

I hope you have as much fun trying these recipes as I have had posting them. I love to cook and I love to share recipes with others... please feel free to try any and leave some love as you do! Also feel free to share any that you have, I'm willing to try anything new! The kitchen really is fun with a little love and laughter.... and some dancing!

Showing posts with label Tomatoes. Show all posts

Sunday, August 12, 2012

Salmon Packets

 It's been a while, eh? Sorry about that. I've been cooking lots of new, yummy things, I just haven't taken time to take pictures or post them. But this was too good NOT to! And so simple!

Put everything in.... 

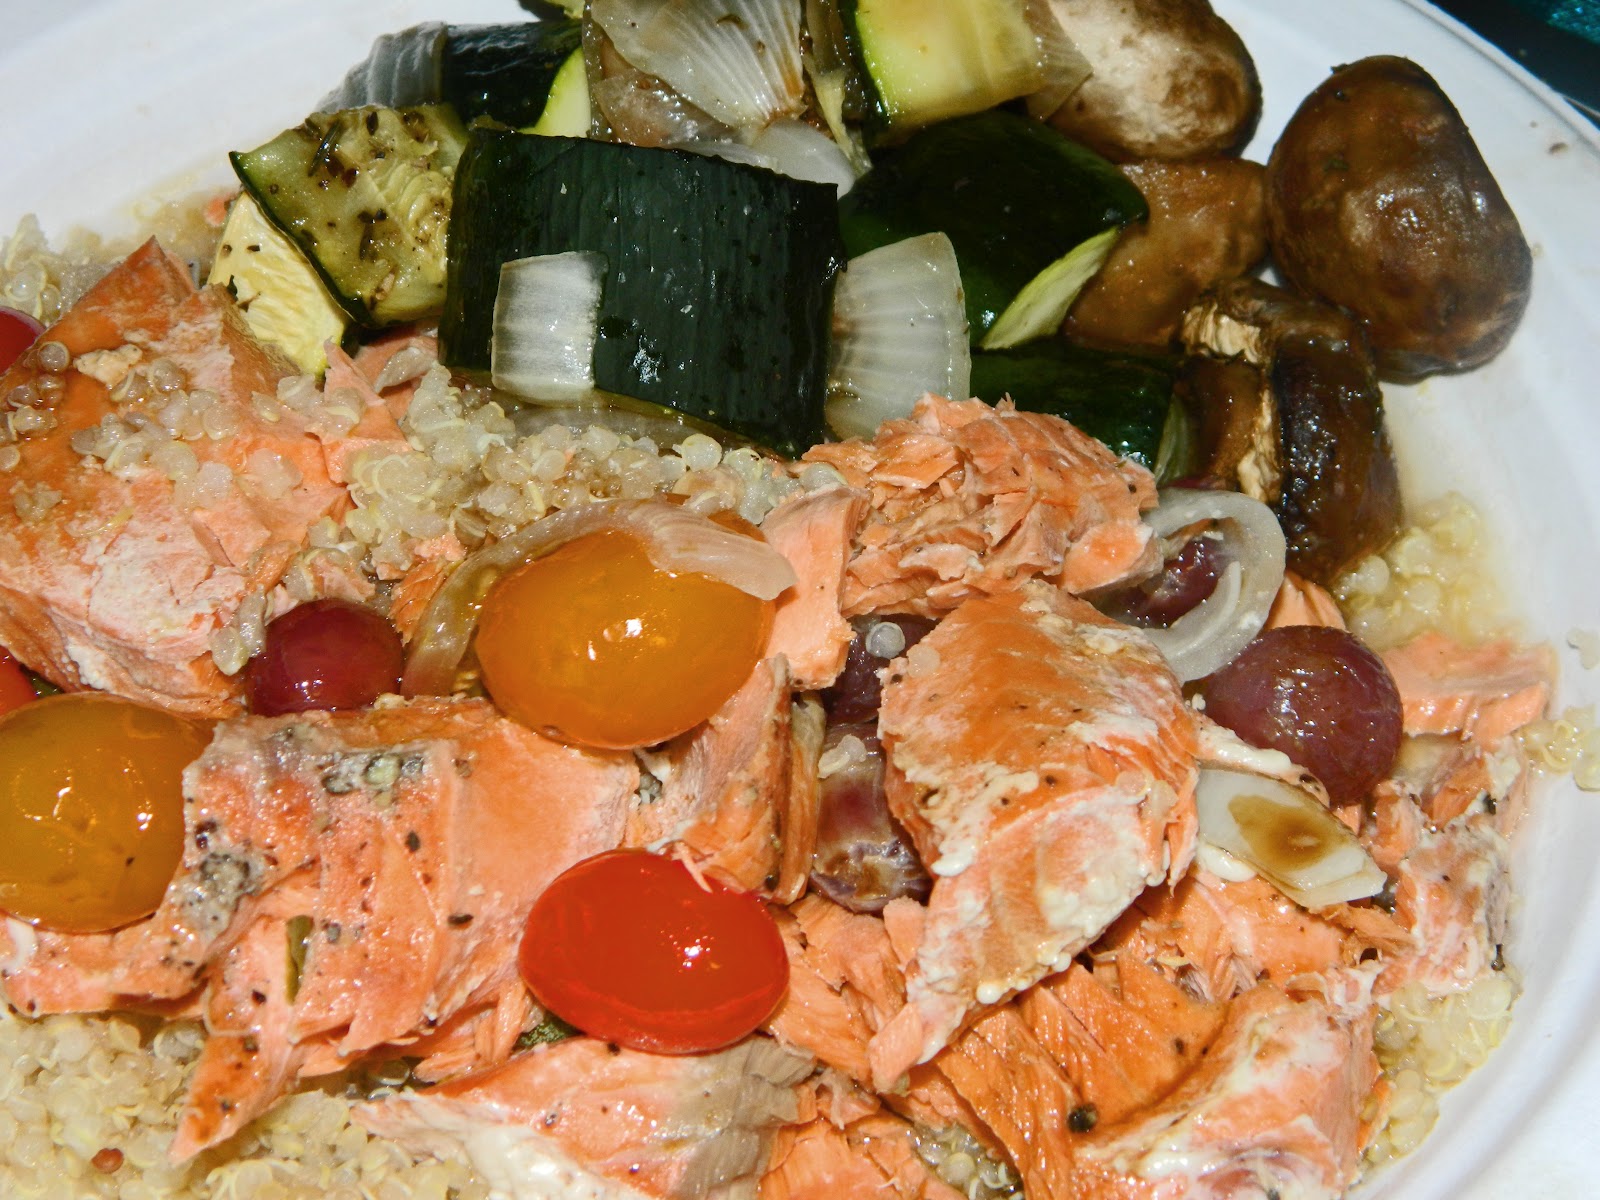
And Dinner is served. 

Salmon Packets with roasted Squash

Ingredients:

2-4 Sockeye Salmon filets
1/2 onion, halved then sliced thick
handful grape tomatoes per filet
handful of red grapes per filet
2TBS capers per filet
1-2 lemons, quartered
2TBS white wine per filet
1TBS olive oil per filet (grape seed oil would be great too)
sea salt and fresh pepper

For the Squash:

2 Zucchini squash, diced into fairly large chunks
1- 8oz pkg button mushrooms (baby bells my favorite), cut in half (remove the stems)
1/2 onion, diced (fennel would be great too)
2TBS-1/4C olive oil
sea salt and fresh pepper 

1 C. prepared Quinoa


Instructions:

 Preheat oven to 400.
 Line a cookie sheet with foil, then prepare 2-4 sheets of foil for packets. Spray lined cookie sheet with Pam. 
Place salmon filets in center of each sheet of foil. Add sliced onions, tomatoes, grapes, capers and lemons. Starting with one side, fold up edge of foil, creasing the center in as if to form an envelope. Bend the top corner over to seal. Repeat on opposite side, leaving a small opening in the top to pour liquid ingredients. 
 Add white wine and oil. Seal opening shut. Continue until all filets are used up. Line up on one end of cookie sheet. 

For the squash:
On the same cookie sheet, add veggies. Pour oil over, sprinkle with salt and pepper and mix around until well coated. Spread out evenly across cookie sheet.

Bake entire sheet for 25 minutes. Once in the oven, start the Quinoa per package directions.

To serve: Divide Quinoa between plates. Fork out salmon and cover with veggies and sauce from foil packet. Side with squash mixture.


Thursday, January 19, 2012

Fish cooked in a Bag with veg

 One of my goals this year is to eat healthier. Did you know the Food Guide Pyramid is no longer in use? Now the USDA wants our meals to look more like this:


I like it. It helps me know how much of each item we should be eating during our meals. Much more simple! So tonight, I sort of just threw this meal together. No, really. I did. And I got the recipe from Cook This, Not That!


If you haven't seen the Eat This, Not That! books, you really should check them out. They have changed the way I eat. That and Food, Inc. on Netflix instant. Worth the time, trust me!


This recipe is so simple and you can make it with any kind of fish you like.

Ingredients:

Fish fillets (3-4oz each, I used Mahi Mahi)
Onions, sliced (or fennel sliced)
grape tomatoes, halved
marinated artichoke hearts, cut up
olives, sliced (your choice here, I used manzanita)
lemon slices
Sea Salt and fresh ground pepper
Olive oil
White wine vinegar (or white wine)

Parchment paper (or foil)

Instructions:

1. Preheat oven to 400.

2. Take 2 large sheets of parchment or foil, place a fillet in the center of each, and top equally with the artichokes, tomatoes, olives, fennel or onion, and lemon. Drizzle with oil and wine; season with salt and pepper. Fold the paper over the fish and seal by tightly rolling up the edges, creating a secure pouch. It's important the packets are fully sealed, so that the steam created inside can't escape.

3. Place the pouches on a baking sheet in the center of the oven and bake for 20-25 minutes. Serve with lemon and rice and fresh veggies.

Saturday, November 13, 2010

Halibut in a Bag


This recipe comes from one of my favorite series of books: Eat This, Not That, particularly Cook This, Not That. Did you know a Whopper is so much worse for you than a Big Mac? I had no idea! That's why I love these books.
I was going to make this for dinner tonight, using Cod instead, but it's so cold that I really don't feel like cooking. Good for my budget, not so good for my waist-line(in the sense that instead I'll probably end up eating junk food... argh)!
I have made this before and it really is simple and delicious. Instead of fennel, I sliced up a regular white onion. Instead of kalamata olives, I used green olives. And instead of white wine, I used red wine vinegar. I also added a dash of fresh ground pepper and a dash of ginger. And as a side, I made up a bit of Quinoa. Yum!

Ingredients:

2 fillets of halibut or other firm white fish (5 oz each)
1 jar (8 oz) marinated artichoke hearts, drained
1 cup cherry tomatoes
2 Tbsp chopped kalamata olives
1/2 medium fennel bulb, thinly sliced (or onion)
1 lemon, half cut into thin slices, the other half cut into quarters
1/2 Tbsp olive oil
1/4 cup dry white wine (or vinegar)
Salt and black pepper to taste

Instructions:

Preheat the oven to 400°F.

Take 2 large sheets of parchment paper or foil, place a fillet in the center of each, and top equally with the artichokes, tomatoes, olives, fennel, and lemon slices. Drizzle with the olive oil and wine; season with salt and pepper. Fold the paper or foil over the fish and seal by tightly rolling up the edges, creating a secure pouch. It’s important the packets are fully sealed, so that the steam created inside can’t escape.

Place the pouches on a baking sheet in the center of the oven and bake for 20 to 25 minutes, depending on how thick the fish is. Serve with the remaining lemon wedges.


NOTE on COOKING IN A BAG (from Cook This, Not That!):
The French call it en papillote; the Italians, en cartoccio. It's a technique that combines, health, flavor, and convenience as effectively as any cooking method in the kitchen. By adding a bit of liquid, you create a perfect steaming environment for chicken, fish, and seafood. Toss in tomatoes, onions, zucchini- anything that will cook in 15 min or less- to bolster the flavor. The best part? No cleanup!!

Thursday, October 28, 2010

Canning 101: Salsas, Applesauce and Strawberry Jam

This posting is going to be long, and full of info... if I didn't cover something you've been interested in canning, it's always a good idea to either pick up a Ball canning book, or do an online search. Just make sure it's a credible source (i.e. University's usually have GREAT canning info!). Well... it's late, so let's get started!


SALSA:
Tomato and Tomatillo Verde

Note about Salsas: Be sure to follow the recipe(s) TO. THE. T. If you don't, you could end up very very sick. Please, be careful!


Tomato Salsa w/ Cilantro

8 cups chopped fresh Tomatoes

1 cup Jalapeno Peppers, seeded and minced

1 large White Onion, diced

6 cloves Garlic, minced

½ cup chopped fresh Cilantro

1 TBS Salt

¾ cup Cider Vinegar

¼ cup fresh Lime Juice

Combine all ingredients in a large pot. Bring to a boil over medium high heat. Reduce heat and simmer about 10 minutes. Pour hot salsa into hot, sterilized canning jars, leaving 1/4 inch headspace. Seal jars with two piece caps. Process in a boiling water bath for 15 minutes.


****************


Green Tomatillo Salsa (aka Salsa Verde)

Yield: 5 pints

• 5 cups chopped tomatillos
• 1½ cups seeded, chopped long green chiles
• ½ cup seeded, finely chopped jalapeño peppers
• 4 cups chopped onions
• 1 cup bottled lemon juice
• 6 cloves garlic, finely chopped
• 1 tablespoon ground cumin (optional)
• 3 tablespoons dried oregano leaves (optional)
• 1 tablespoon salt
• 1 teaspoon black pepper

Caution: Wear plastic or rubber gloves and do not touch your face while handling or cutting hot peppers. If you do not wear gloves, wash hands thoroughly with soap and water before touching your face or eyes.

Procedure: Wash and rinse canning jars; keep hot until ready to use. Prepare lids according to manufacturer’s directions.

Preparing Tomatillos: Remove the dry outer husks; wash thoroughly. They do not need to be peeled or seeded.

Preparing Peppers: The jalapeño peppers do not need to be peeled. The skin of long green chiles may be tough. If you choose to peel chiles, peel using one of these two methods to blister skins:

Oven or broiler method to blister skins – Place chiles in a hot oven (400°F) or broiler for 6 to 8 minutes until skins blister.

Range-top method to blister skins – Cover hot burner (either gas or electric) with heavy wire mesh. Place peppers on burner for several minutes until skins blister.

To peel, after blistering skins, place peppers in a pan and cover with a damp cloth. (This will make peeling the peppers easier.) Cool several minutes; slip off skins. Discard seeds and chop.

Hot Pack:Combine all ingredients in a large saucepan and stir frequently over high heat until mixture begins to boil, then reduce heat and simmer for 20 minutes, stirring occasionally. Ladle hot into clean, hot jars, leaving ½-inch headspace. Remove air bubbles and adjust headspace if needed. Wipe rims of jars with a dampened, clean paper towel; apply two-piece metal canning lids.

Processing Times for Hot Packing Pints (by altitude):
0-1,000ft. : 15min.
1,001 - 6,000ft : 20min.
Above 6,000ft : 25min.

****************

APPLESAUCE

You can do many things when making your own applesauce. You can skip the sugar if you want, or you can add flavorings like Strawberries, Pears, etc to make flavored applesauce. And it's just so dang easy. My 2 year old loves helping me prepare the apples (he sits on the counter and hands me the apples that need peeled).

Ingredients:


6 apples (Fuji, Golden Delicious, Granny Smith, or McIntosh); washed peeled, cored and quartered.
3/4C water
1/4C white sugar
2TBS brown sugar
1tsp. ground cinnamon
strips of lemon peel from one lemon
juice of one lemon

Instructions:

Combine all ingredients in a large pot. Bring to a boil. Lower heat and simmer for 20 min. Remove lemon peel. Mash with a potato masher, or blend it (careful of the steam!) for finer pieces.

To Can:
1. Boil water in canner.
2. Sterilize jars and lids according to package directions.
3. Use funnel to fill jars with 1/2in headspace.
4. Swipe around inner edges to remove air.
5. Wipe rims clean, screw on lids and place in boiling water canner.
6. Boil for 20 minutes, water should be an inch above jars.
7. Remove jars and allow to cool. You should hear an audible "Pop" as they seal.

*If a jar isn't sealed, it can either be re-canned right away, or stored in the fridge.


****************

JAM:
Strawberry


I don't have an exact recipe for strawberry jam as I just use what the Pectin package says to do. That's really the best thing to do, because all Pectins are different and require different things. A friend and I found that out the hard way one day when we got together to make the stuff. She was making Freezer Jam and I canned. She had 2 different types of Pectin, and they were both totally different from mine. We were amazed at how different our recipes were just because of the different Pectins. I don't think I used the right amount of sugar, or something, because mine turned out more like Strawberry Syrup! But it was still tasty!
So my advice would be to start with at least 5lbs of GOOD strawberries (if they're bruised or a little soft, they'd be best to dehydrate!) and a bag of sugar.
The picture above is from a batch my mom made shortly after my son was born. I was hoping to help her more.... but he was a demanding baby. But it turned out so yummy!!

I do have a really yummy Pepper Jelly recipe HERE.

****************


FAQ's about Canning:
If you have any questions that aren't answered below, please contact me and I'll add them!

1. Do I need a fancy pressure cooker or canner to be able to can things?
Not at all! All you really need is a large stock pot, possibly with a rack for the bottles to sit on and a pair of tongs.

2. Why don't you do any Freezer-type things? Isn't that easier?
I wouldn't say it's EASIER to make freezer-canned goods. The reason I don't is plain and simple. I don't have a large freezer. I can barely fit our regular foods in there without adding jars or bowls to it! :) If you have the room, by all means... go for it!

3. How long do canned items last before they "expire."
Believe it or not, they do have an expiration date. Most canned items are good for about a year. Just be sure to check the smell, and color. If you're unsure, throw it out. Better to be safe than sorry!

4. What type of jars/lids are best to use?
As long as it says Kerr or Ball on the jar and/or lid... you're good! If you plan on entering them into a County Fair, you'll want to have matching jars and lids! Some people like the Wide Mouth variety and they're nice... but I just use the regular mouth size. It's easier to find bands and lids!

5. What size jar is best?
It depends on what you're making. For jams and jellies I would go with nothing larger than a pint. I usually use 1/2 pints for them, though. For things like Salsa or sauces, you'd want to do at least a pint, if not larger. But they even have little tiny ones now... those would be nice for my Pepper Jelly!


Happy Canning!!


Sunday, October 10, 2010

Shake 'n' Bake Chicken


I'm so sorry it's been so long since I've posted. I was planning on making this post DAYS ago... but for some reason never got around to it. But here it is. It is probably the most simple thing you could make. It's great for lunch... dinner... or just a snack! :) Really, all you need is chicken, a tomato and a few pickle slices (and some shake n bake). The best part is, if you make a few extra, you can just reheat them for a sandwich, or cut it up into a salad. Super yum!!

The inspiration from this comes from a meal my mom always cooked growing up. Exactly the same items, except we had sliced cucumbers and sliced tomatoes on the side. I mixed that with McDonald's Southern Style Chicken Sandwich. Mmmmm...

Shake 'n' Bake Chicken w/ tomato and pickle "salad"

Ingredients:

4 - boneless, skinless chicken breasts
1 pkg. Shake N Bake - any flavor, I prefer Chicken
fresh tomatoes
sliced hamburger dill pickles
salt and pepper

Box of Chicken Rice-A-Roni

Instructions:

1. Pre-heat oven to 375. Pour Shake seasoning into Shake Bag and place 1-2 breasts at a time inside. Shake well, making sure to completely coat chicken. Repeat until all chicken is used up (if using more than 5 breasts, it's best to use 2 bags/seasonings).
Place chicken on a foil-lined pan. Place in oven and bake for 30-40 minutes, or until completely cooked.
2. Meanwhile, prepare rice according to package directions.
3. Slice (or chunk) tomatoes and dice up pickles. Sprinkle with salt and pepper and combine.
4. Serve and enjoy!

The different textures and flavors are so perfect! If you don't like raw tomatoes, you definitely won't like this meal and you shouldn't try it without. It's just not the same. But it's definitely worth it to just give it a try. My mouth is watering.....